Semi-Gloss vs. Satin Paint for Cabinets

Choosing between semi-gloss and satin paint for kitchen cabinets is a common dilemma. Both offer attractive finishes, but their durability, cleaning requirements, and visual appearances differ significantly, impacting their suitability for various lifestyles and kitchen environments. This comparison will highlight the key distinctions to aid in making an informed decision.
Durability Comparison of Semi-Gloss and Satin Cabinet Paint
Semi-gloss paint boasts superior durability compared to satin. Its higher sheen results from a thicker, more robust film that better resists scratches, scuffs, and moisture. This makes it ideal for high-traffic areas and kitchens with children or pets where accidental bumps and spills are more common. For instance, a semi-gloss finish on cabinets near a frequently used sink would be more resistant to moisture damage and cleaning-related wear than a satin finish. Satin paint, while still durable, offers less protection against harsh impacts and abrasion. However, its slightly softer sheen might make minor imperfections less noticeable. Imagine a family with young children: the semi-gloss finish might better withstand the inevitable bumps and scrapes associated with active family life.
Cleaning and Maintenance Requirements
Both semi-gloss and satin paints are relatively easy to clean, but their cleaning methods and ease of maintenance differ slightly. Semi-gloss’s hard, smooth surface makes it exceptionally easy to wipe clean; spills and smudges are easily removed with a damp cloth. Satin, while cleanable, might require slightly more effort to remove stubborn stains. Aggressive scrubbing could potentially damage the satin finish, necessitating gentler cleaning techniques.
| Finish | Ease of Cleaning | Recommended Cleaning Methods | Frequency |
|---|---|---|---|
| Semi-Gloss | Very Easy | Damp cloth, mild soap solution | Daily or as needed |
| Satin | Easy | Damp cloth, mild soap solution; avoid harsh scrubbing | Daily or as needed |
Visual Appearance and Light Reflection
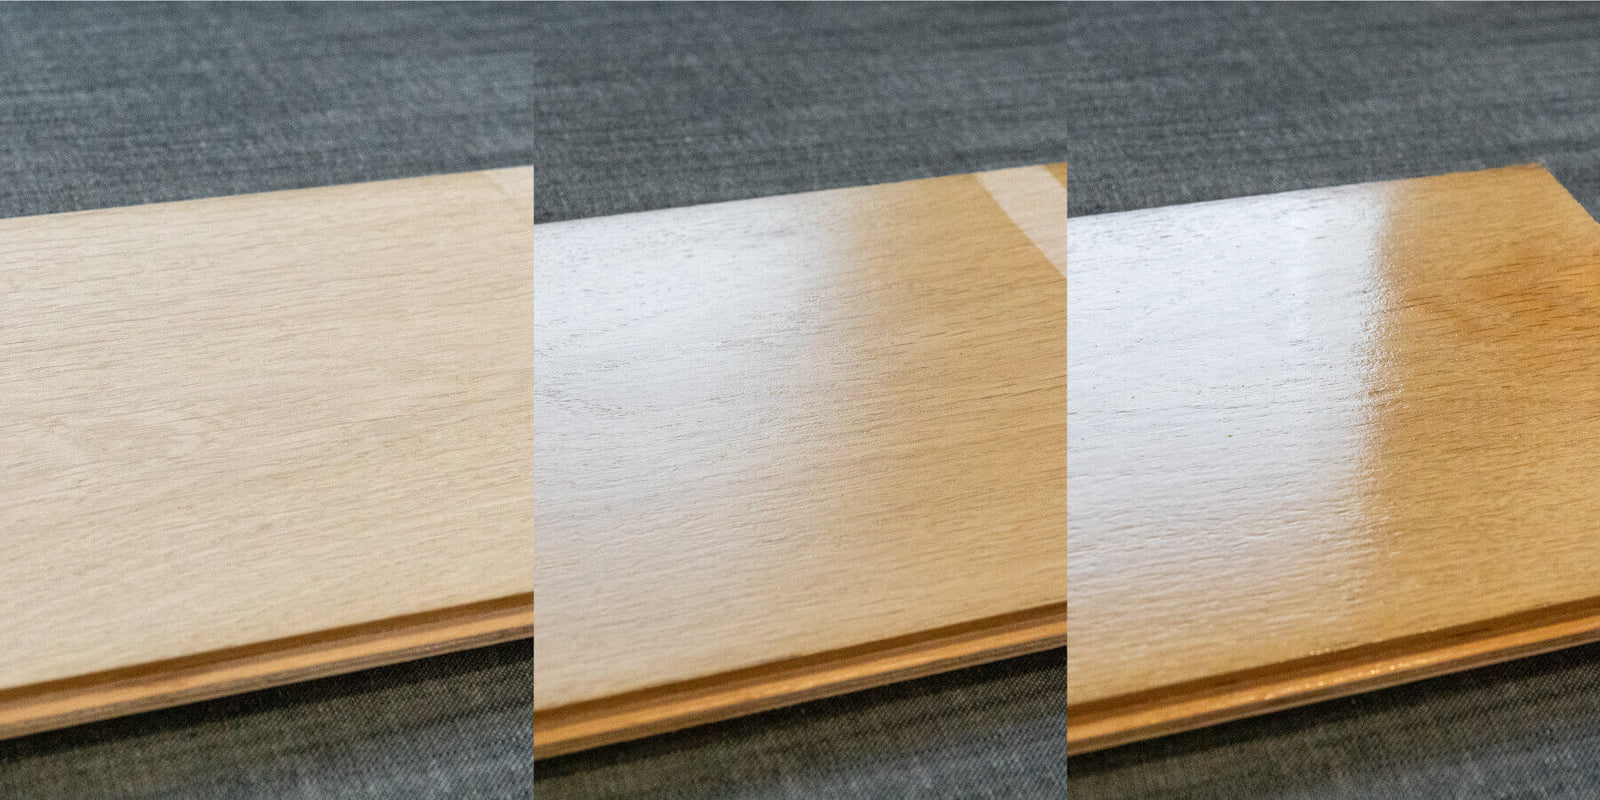
The visual difference between semi-gloss and satin lies primarily in their sheen. Semi-gloss exhibits a noticeable shine, reflecting light more intensely, creating a brighter, more formal look. This high-gloss finish can highlight imperfections in the cabinet’s surface, so meticulous preparation is essential. Satin, on the other hand, possesses a softer, less reflective surface, creating a warmer, more understated aesthetic. It masks minor imperfections more effectively, providing a more forgiving finish. The light reflection on a semi-gloss cabinet would be akin to a mirror’s, while the reflection on a satin cabinet would be softer, more diffused, like a gentle glow. The choice depends on the desired level of formality and the overall style of the kitchen. A modern, minimalist kitchen might benefit from the sleekness of semi-gloss, whereas a more traditional or rustic kitchen might find the subtle elegance of satin more appealing.
Choosing the Right Sheen for Your Kitchen Style
Selecting the appropriate sheen for your kitchen cabinets is crucial for achieving the desired aesthetic and functionality. The sheen significantly impacts how light reflects off the surfaces, influencing the overall look and feel of the space. Semi-gloss and satin finishes offer distinct advantages, making the choice dependent on your kitchen’s style and personal preferences.
Sheen Selection Based on Kitchen Style
The choice between semi-gloss and satin paint for kitchen cabinets depends heavily on the overall kitchen style. Different sheens complement different design aesthetics, enhancing the visual appeal and creating a cohesive look.
- Modern Kitchen: Modern kitchens often prioritize clean lines, minimalist designs, and a sleek aesthetic. A semi-gloss finish enhances this look, providing a smooth, reflective surface that adds a touch of sophistication. The high gloss subtly reflects light, creating a sense of spaciousness, perfect for smaller modern kitchens.
- Traditional Kitchen: Traditional kitchens often feature ornate details, warm tones, and a sense of classic elegance. A satin finish works beautifully in this context, offering a subtle sheen that complements the richness of traditional design elements without being overly reflective. The softer sheen prevents the cabinets from overpowering the other details in the room.
- Farmhouse Kitchen: Farmhouse kitchens typically embrace a rustic charm with a blend of natural materials and a relaxed atmosphere. A satin finish provides a warm, inviting feel, perfectly complementing the casual elegance of a farmhouse style. Its lower reflectivity avoids creating a stark contrast against the often-used natural wood elements.
Color Palettes for Semi-Gloss and Satin Finishes
The color choices you make can significantly influence the final look of your kitchen, especially in conjunction with the sheen of the paint. Consider the following palettes for optimal results:
Paint cabinets semi gloss or satin – Semi-gloss finishes often benefit from bolder color choices that showcase their reflective properties. Lighter colors can also work well, creating a bright and airy feel.
- Semi-Gloss: Deep blues, charcoal grays, crisp whites, and creamy off-whites. These colors create a dramatic and sophisticated look when paired with the high-gloss finish.
Satin finishes tend to work best with a wider range of colors, allowing for both subtle and dramatic choices. The softer sheen complements both light and dark shades effectively.
- Satin: Warm earth tones (browns, tans, greens), muted blues and greens, and classic creamy whites. These colors create a calming and inviting atmosphere.
Lighting’s Impact on Sheen Perception
Lighting conditions significantly affect how the sheen of your cabinet paint appears. Different light sources can alter the perception of reflectivity and overall finish.
Natural light, particularly bright sunlight, can make semi-gloss cabinets appear even more reflective, potentially highlighting imperfections. In contrast, satin cabinets will maintain a more consistent appearance under natural light.
- Example: A semi-gloss white cabinet might appear almost mirror-like in direct sunlight, whereas the same cabinet in soft, diffused natural light might show a more subtle sheen. A satin white cabinet will appear consistently soft and matte regardless of the light source.
Artificial light can also impact sheen perception. Warm-toned lighting, such as incandescent bulbs, might soften the appearance of semi-gloss, making it appear slightly less reflective. Cool-toned lighting, such as fluorescent or LED, can enhance the reflectivity, particularly in semi-gloss finishes. Satin finishes are generally less affected by variations in artificial lighting.
- Example: A semi-gloss navy cabinet under incandescent lighting might appear slightly less glossy than under LED lighting. A satin navy cabinet will look relatively consistent under both lighting conditions.
Practical Considerations and Application Techniques: Paint Cabinets Semi Gloss Or Satin

Painting kitchen cabinets, whether with semi-gloss or satin, requires careful planning and execution to achieve a professional finish. Understanding the potential challenges and employing proper techniques is crucial for a successful project. This section addresses practical considerations and provides a step-by-step guide to ensure a smooth and durable paint job.
Challenges and Solutions in Applying Semi-Gloss and Satin Cabinet Paint
Addressing potential issues beforehand significantly improves the outcome of your cabinet painting project. Careful preparation and the right techniques can mitigate many common problems.
- Challenge: Brushstrokes and Lap Marks: Semi-gloss and satin paints can reveal brushstrokes more readily than flat paints. Solution: Use high-quality brushes or rollers designed for smooth finishes. Apply thin, even coats, working in the direction of the wood grain, and overlap each stroke slightly to avoid lap marks. Consider using a paint sprayer for a truly flawless finish, especially with semi-gloss.
- Challenge: Uneven Coverage: Poor surface preparation or using insufficient paint can lead to uneven coverage. Solution: Thoroughly clean, prime (if necessary), and sand the cabinets before painting. Apply multiple thin coats, allowing each coat to dry completely before applying the next. Use a good quality primer designed for cabinets to ensure proper adhesion and coverage.
- Challenge: Drips and Runs: Applying too much paint at once can result in drips and runs, particularly with semi-gloss. Solution: Load your brush or roller lightly with paint. Apply thin, even coats and avoid overloading the surface. Use a high-quality paint that has good leveling properties.
- Challenge: Dust and Debris: Dust or debris settling on wet paint can create imperfections. Solution: Work in a clean, dust-free environment. Use a tack cloth to remove any dust before applying each coat of paint. Consider using a respirator mask to prevent inhaling paint particles.
- Challenge: Achieving a Consistent Sheen: Differences in sheen can occur if application techniques are inconsistent. Solution: Maintain a consistent wet edge while painting to prevent variations in the final finish. Apply even pressure while brushing or rolling.
Preparing Cabinets for Painting, Paint cabinets semi gloss or satin
Proper preparation is the foundation of a successful paint job. Taking the time to thoroughly prepare your cabinets will significantly improve the final result and its longevity.
- Clean the Cabinets: Remove all hardware (knobs, hinges, etc.). Thoroughly clean the cabinet surfaces with a degreaser to remove grease, grime, and any old wax or polish. Rinse with clean water and allow to dry completely.
- Repair any Damage: Fill any holes, cracks, or dents with wood filler. Allow the filler to dry completely and sand smooth.
- Prime the Cabinets (if necessary): Priming is crucial, especially on bare wood or previously painted surfaces with significant imperfections. Choose a high-quality primer designed for cabinets. Apply a thin, even coat and allow it to dry completely.
- Sand the Cabinets: Lightly sand the primed surface (or existing paint if priming isn’t necessary) with fine-grit sandpaper (180-220 grit) to create a smooth surface for painting. Wipe away any sanding dust with a tack cloth.
- Tape and Mask: Protect areas you don’t want to paint, such as countertops or adjacent walls, with painter’s tape and drop cloths.
Rewritten Article on Painting Kitchen Cabinets
[Insert rewritten article text here. This section requires the original article text to be provided.]
